 Spring has popped here in Atlanta and we are leafed out! It’s been so pretty here, but the weather continues to be fickle…hot one day and downright cold the next with freezing temperatures coming this weekend, which is not good for azaleas. Still, the longer days and beautiful spring colors are most welcome.
A few weeks ago as the first buds were starting to show, we took a jaunt up to Cashiers, North Carolina for the weekend. It was still very much winter there, but the hiking was magnificent. Our close proximity to Highlands—which is only 15 minutes from Cashiers—meant that we could check out some very good new restaurants. One of them was Wild Thyme Gourmet. This restaurant used to be in a very small cottage a block or so off the main street of Highlands. They had little to no seating other than outdoors, but we had lunch there a couple of times and it was good. A few years ago they moved into a much larger space right on the main street and expanded their menu. It is now a fine restaurant worthy of reservations!
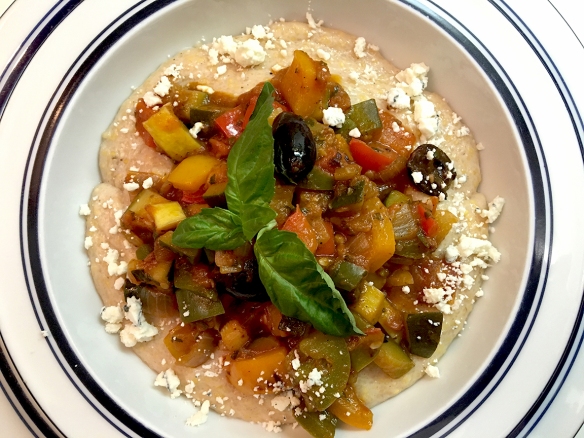
The night we dined at Wild Thyme Gourmet, both my husband and I were drawn to the vegetarian dishes on the menu. He ordered the ricotta and tapenade stuffed ravioli with fresh basil and tomato sauce. I ordered a Provençal vegetable ragout with soft polenta. The vegetables were meltingly delicious with a slightly smoky and rich undertone and were incorporated into a tomatoey sauce with briney kalamata olives. This was served atop a nutty and cheesey tasting soft polenta with just a few crumbles of soft, fresh goat cheese scattered on top. Both dishes were outstanding, so much so that the taste haunted me all the way back to Atlanta…and you know what that means!
So here’s my recreation of that delicious dish, which started off by making Jacques Pépin’s exceptionally wonderful version of tapenade which you can see here. While it wasn’t exactly like the dish at the restaurant, we thought it was every bit as good. And you guessed it, the next post will be my husband’s ravioli dish, so stay tuned.
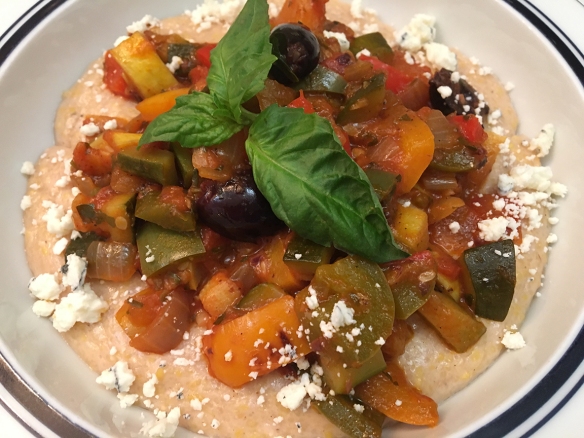
Provençal Vegetable Ragout with Soft Cheese Polenta
Serves 6
For the Ragout:
2 medium uncooked zucchini, split in half lengthwise
2 medium yellow summer squash, split in half lengthwise
1 each red, yellow, orange and green bell pepper, halved, stemmed and seeded
2 Tablespoons olive oil
1 medium red onion, peeled and diced
1 Tablespoon minced garlic
3 medium plum tomatoes, diced
1/4 cup tomato paste
1 1/2 Tablespoons Kalamata olive tapenade, preferably homemade
12 Kalamata olives, pitted and halved
1 1/2 fluid oz. Pernod or Pastis liquor
1 1/2 oz. unsalted vegetable stock, preferably homemade
1 Tablespoon Italian Parsley, chopped
2 teaspoons fresh thyme leaves, chopped
1 Tablespoon fresh basil, chopped, plus extra leaves for garnish
1 Tablespoon soft fresh goat cheese, crumbled
For the Polenta:
3 cups unsalted vegetable stock, preferably homemade
3/4 cup skim or 1% milk
4 Tablespoons half-and-half
1 cup whole-grain yellow cornmeal
3/4 cup grated Parmigiano Reggiano cheese
Freshly ground black pepper and kosher salt
Place the halves of zucchini, squash and peppers on a medium high heat grill or grill pan and grill both sides just until you have nice char marks. Remove from the heat and dice into 1/2 inch pieces.
Place olive oil in a large skillet over medium heat. Add the onion and the garlic and cook until fragrant. Add the zucchini, squash, and peppers and cook, stirring occasionally, until vegetables are starting to get tender. Add the tomato, tomato paste, olives, tapenade, vegetable stock, herbs and the Pernod or Pastis and cook on low heat, covered, until the tomatoes are soft and all the ingredients are integrated, about 10 minutes, stirring occasionally. Season to taste with salt and pepper. Turn off heat and leave covered while making the polenta.
Bring the 3 cups vegetable stock, milk and half and half to a gentle boil. Add the cornmeal slowly while whisking and then turn the heat to low. Continue to whisk until the polenta is creamy and tender to the bite, about 5-8 minutes. Add the parmesan and some freshly ground black pepper. Taste and add salt if needed. Serve 3/4 cup polenta with 1/6 of the ragout on top. Finish with a tiny sprinkle of goat cheese and a spring of basil, if desired.
*****
For those of you “Jones-ing” for spring, rest assured it is on its way. Here are some pics from our yard and neighborhood to tide you over.