
A loaf of bread, a spot of tea and thou…the perfect combo for a damp January day. (The cat fetish was made by fellow potter and friend, Ana Vizzuraga.)
Happy 2014! I hope all of you had a joyful holiday season and rang in the new year with great gusto and style.
We enjoyed a lovely and extended holiday time traveling and visiting with family and friends, returning home just in time to say goodbye to 2013 (with a bit of good riddance, in my book.) Alas, 2013 wouldn’t quite let go of me in that immediately upon my return, I contracted a stomach flu-type bug, which was with me all week. Needless to say, being in the kitchen was pretty far from my mind.
As this first weekend of 2014 rolls past, I’m finally feeling much better and I think I’m ready for a little sweet and light in my cooking…something for my breakfast and dessert pleasure. So what’s in the fridge and cupboard? Pears, walnuts and lots of candied ginger left over from making chai tea mix and chocolate hazelnut and ginger biscotti. Although I love pears, I hardly ever cook with them, usually preferring to eat them raw in salads or with cheese. But of course, they are so transcendent when cooked…the heat enhancing their natural sweetness, releasing their perfume and still retaining a most pleasant texture.

It’s quite hard to sit and wait for this to cool off.
This Pear, Candied Ginger and Walnut Quick Bread was an experiment, and it came out even better than I had hoped. It has a very chunky fruit texture, which worried me a bit when I put it in the oven—wasn’t sure if I’d gone overboard on the pears—but the result is a moist, fruity, crunchy and incredibly flavorful loaf. You get a hint of the ginger and an essence of nutmeg in each bite. The tiny bit of lemon zest brings all the flavors together. I could eat the whole thing in a sitting, that’s how good it is…but I won’t. It is a new year after all, and there are all those pesky resolutions to be considered.
It’s been quite cold here this weekend, and even more so in other parts of the country (and world), which was all the more reason to enjoy a slice of this bread with a nice, hot cup of tea, coffee or cocoa.
Cheers, stay warm (or cool, if you’re in the southern hemisphere) and have a happy day!
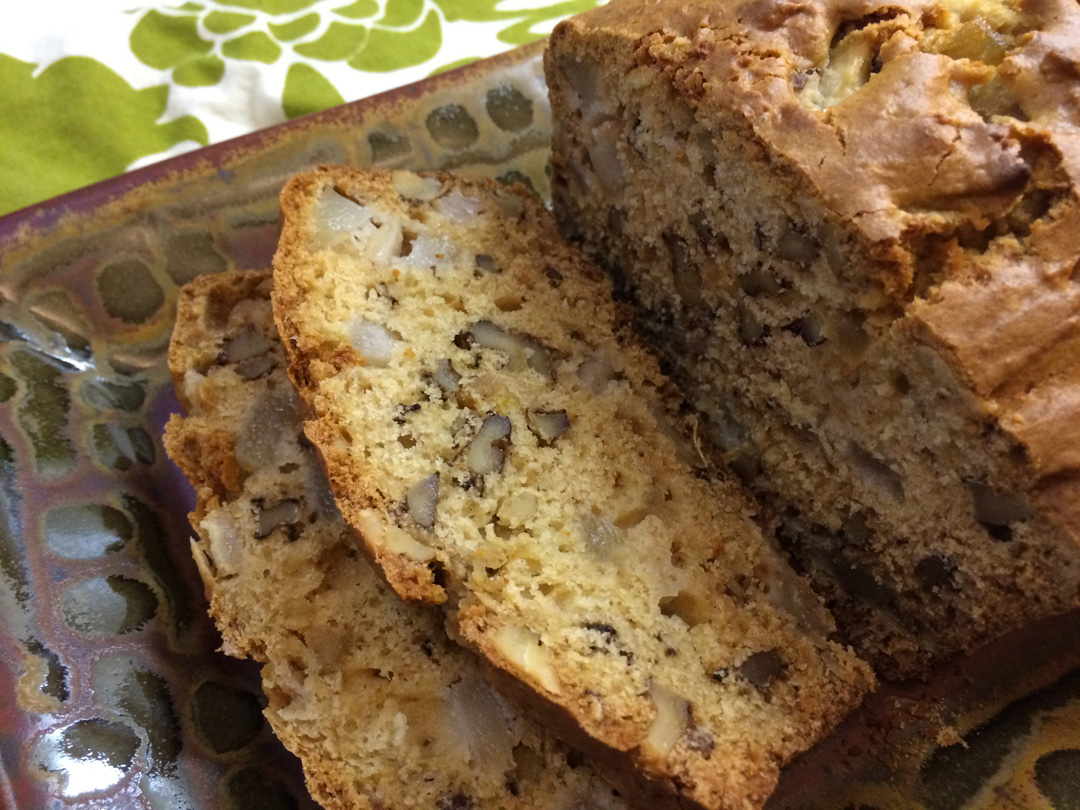 Pear, Candied Ginger and Walnut Quick Bread
Makes 1-5″ x 9″ Loaf
3 tablespoons unsalted butter, softened, plus a bit more for greasing the pan
1/2 cup packed light brown sugar
1 large egg
1/2 teaspoon fresh lemon zest
2 cups all purpose flour
2 teaspoons baking powder
1 teaspoon baking soda
1/4 (generous) teaspoon freshly grated nutmeg
1/8 teaspoon ground cinnamon
1/2 teaspoon kosher salt
1/3 cup milk
2 medium pears, I used a Bosc and a Bartlett, peeled, cored and diced (about 2 full cups)
3/4 cup coarsely chopped walnuts
2 tablespoons finely chopped candied ginger
Preheat the oven to 350 degrees F. Grease a 9 x 5 loaf pan with butter and set aside.
In a medium bowl, sift together the flour, baking powder, baking soda, nutmeg, cinnamon and salt. In another larger bowl, beat the sugar and butter together with a hand mixer until well blended, then add the egg and zest and beat until well combined. Add the flour mixture and the milk in 3 alternate batches, alternating and beating each ingredient until just combined, do not over mix. Scrape the batter off the beaters, then add the pear, walnuts and ginger, stirring by hand gently until evenly combined. Transfer the batter to the prepared loaf pan (it will be thick, fairly stiff and lumpy), spread it until it is evenly dispersed in the pan and smooth the top. Bake at 350 degrees F for 50-55 minutes, or until the top is golden brown, the loaf is shrinking from the sides of the pan and a toothpick inserted into the center comes out clean.
Transfer the loaf to a wire rack and allow it to cool in the pan for 15 minutes, then remove it from the pan and allow it to cool on the rack until room temperature. Slice with a sharp serrated bread knife and enjoy plain, or with a tiny bit of sweetened whipped cream if you’re still feeling decadent after the holidays.