Money Tartlets

tarts1Happy 2017! Yes, here we are barreling forward into the new year and I’d planned to post this at the beginning of it…then mid-January, and now it will be just in time for the Super Bowl Sunday festivities this coming weekend. That’s okay because really, these little tartlets are wonderful for any day, any occasion, or no occasion at all.

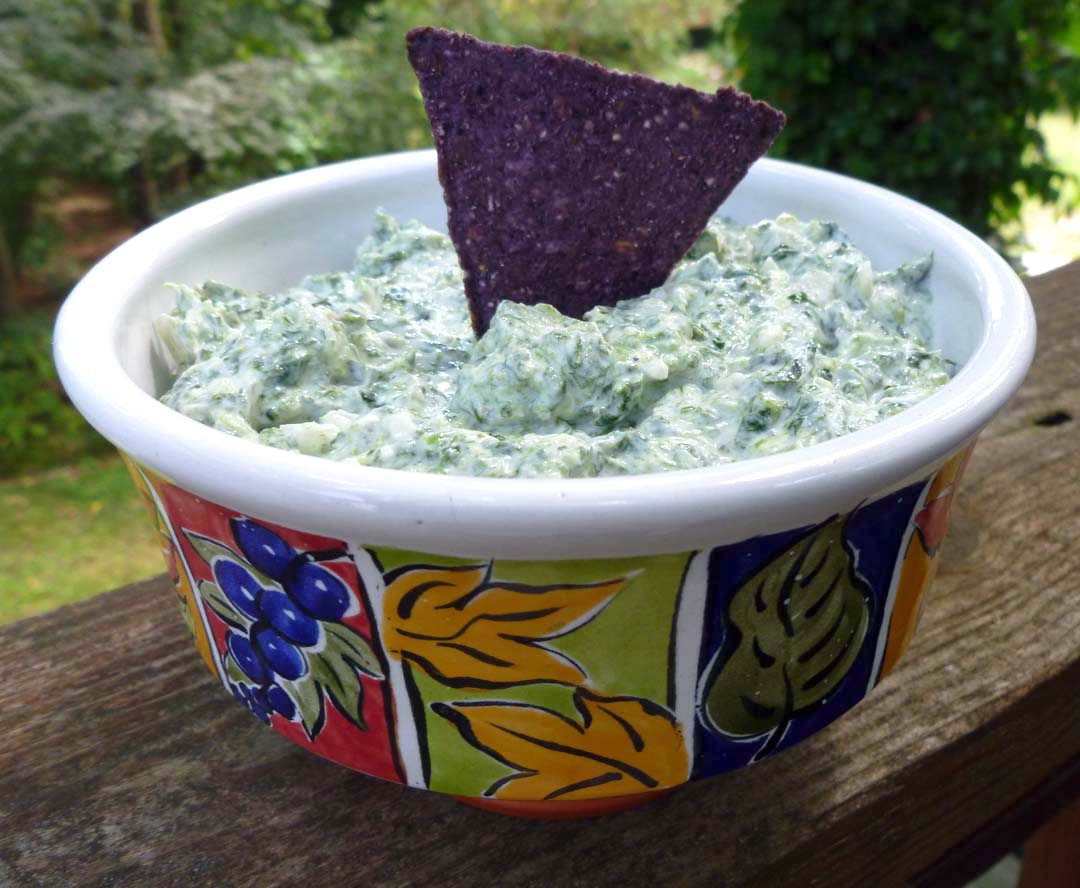
Why are these called “Money” tartlets, you may ask? Well there’s a tradition here in the southern U.S. to eat your “greens” on New Year’s Day to guarantee wealth in the coming months (as well as eating black-eyed peas for good luck), and since New Year’s Day was the first time I made these, it only made sense to call them “money” tarts. Plus once they are baked, these really are the color of (U.S.) dollars. So there you go.

No matter what you call them, they are delightful to eat and a lovely way to enjoy your greens. These savory morsels sport a filling that is much like the Greek greens pie spanakopita, but with a few tasty twists including a touch of toasted almonds and a bit of parmesan cheese to finish. Since they are small and made with phyllo dough instead of a traditional pastry crust, I like to think that they’re a bit healthier than your average tart, too…or three…or four!

Money Tartlets make a perfect small bite for an appetizer with a cocktail or a welcome addition to any pot luck event. As an added bonus, using purchased phyllo tartlet shells from your grocer’s freezer helps these tartlets to come together quickly. Of course if you have the time and the desire, feel free to make your own phyllo pastry. I sure won’t hold it against you.

Make these tartlets for the game, place your bets and enjoy! (Go Atlanta Falcons.)

tarts2sm

Money Tartlets
Makes 30

1/2 large red onion, peeled and finely chopped
1 large clove of fresh garlic, peeled and minced
1 1/2 Tablespoons of olive oil
1/2 teaspoon of kosher salt
several grinds of fresh black pepper
1/8 teaspoon of freshly ground nutmeg
1 – 10 oz. package of frozen, chopped spinach, thawed, squeezed and drained of as much liquid as possible
1 large egg, whisked to combine
1/3 cup sliced almonds, lightly toasted and finely chopped
1/3 cup crumbled feta cheese
1/3 cup cottage cheese
1 1/2 teaspoons Panko breadcrumbs
Additional 1/8 teaspoon kosher salt and a few more grinds of freshly ground black pepper
1/3 cup freshly grated Parmesan cheese
30 frozen phyllo mini-tart shells

Preheat the oven to 350 degrees F.

Heat the olive oil in a large, non-stick skillet over medium heat. Add the onion and the garlic, stirring until the onion is softened and transparent, about 3-5 minutes. Add the spinach, 1/2 teaspoon of salt, freshly ground black pepper and nutmeg to the onion and garlic, and cook a minute or two longer, stirring to combine and until any liquid has evaporated. Remove from the heat and allow to cool for 4 minutes.

In a large mixing bowl, combine the egg, feta, cottage cheese, almonds, Panko bread crumbs, 1/8 teaspoon of kosher salt, a few more grinds of black pepper and the spinach mixture, then stir until well mixed.

Place the 30 phyllo tartlet shells onto a rimmed baking sheet about 1 inch apart. Fill each shell with about 1 Tablespoon of the mixture, dividing the entire mixture evenly between all of the shells. Sprinkle each tartlet with some grated Parmesan cheese. Bake the tartlets for about 16 – 18 minutes, or until the cheese is starting to lightly brown, the centers are firm and the shells have a little bit of color around the edges. Remove from the oven and gently place the tartlets on a rack to cool to room temperature. Serve and enjoy.

Advertisement

‘Tis the Season for a Quick and Festive Spinach and Feta Spread

IMG_2551smIt’s less than two weeks until Christmas and less than 3 weeks before a new year arrives! Where has the time gone?

In this busy and festive holiday season, it’s so nice to have a few tricks up your sleeve for last minute holiday entertaining. Along those lines, here’s a versatile savory spread and dip that comes together in a flash, is loaded with delicious flavor and looks very pretty, too. In fact, this vibrant green Spinach and Feta Spread has “party” written all over it.

As a make-ahead spread or even a last minute decision, it can’t be beat in terms of speed and ease of prep. There is no cooking involved at all. Just toss all of the ingredients into a food processor, blitz it until smooth and eat it right away or cover with plastic and keep in the fridge until your guests arrive. You can serve it in a pretty ceramic or crystal bowl alongside some sliced baguette and crackers, or make toasted crostini topped with some spread, a little sprinkle of crumbled feta and a few slivers of spinach leaves. It can also be served at room temperature as a dip with cruditĂ©s. Even if you don’t want to make this for a party, it’s a delectable sandwich spread. Lovely.

Fully loaded freezer! Save even more time by writing the baking instructions on your packages.

So what else do I have up my sleeve this holiday season? These tried-and-true party appetizers and ice box cookies are just the ticket for busy working folks and would-be party hosts. Retro Cheese Olive Bites, Bacon Wrapped Dates and Old Fashioned Ice Box Cookies can be made ahead and are already in my freezer just waiting to be quickly baked and plated, then served at a gathering of friends and family. I made all of these in the span of a late afternoon one weekend…about 3 hours total. And now I’ve got a party in the freezer. Even Santa’s elves can’t beat that for productivity!

cookiesgreen

Old fashioned ice box cookies are wonderful to have on hand. You can take out what you need, slice and bake in a snap. Click here for the recipe and this year I’ve added the zest of one orange to my dough…making them even better!

wholeplate

It wouldn’t be a party without my Retro Cheese Olive Bites and these amazing Bacon Wrapped Dates stuffed with pistachios and apricots from Martha Stewart.

In addition, Mom’s drop sugar cookies cannot be beat! If you have some extra time on your hands, these are THE BEST and fun for kids of all ages to decorate, too. You can find that recipe by clicking here.

Happy Holidays, indeed!

IMG_2551sm

The color of this quick and savory Spinach and Feta Spread is delightful.

Festive Spinach and Feta Spread
Makes 2 cups

2.5 ounces (1/2-5 oz. bag) raw baby spinach
6 ounces crumbled feta cheese
8 ounces cream cheese, softened to room temperature
1 clove of garlic, peeled and chopped
1 teaspoon fresh lemon juice
1/4 teaspoon kosher salt
1/2 teaspoon freshly ground black pepper
1/2 teaspoon no salt pasta seasoning or Italian seasoning blend (I use Trader Joe’s)

Combine all ingredients in the bowl of a food processor and pulse to break up the spinach. Process until smooth and creamy as above. Place in a bowl, cover with plastic wrap and refrigerate for about 15 minutes or more to allow the flavors to blend. Serve with crackers, baguette and/or crudités.


Mini, Customizable Quiches. Maximum Flavor!

finishedcloseup-2Whether you make them for a brunch buffet, as a cocktail nibble or to take to a pot luck party, these mini quiches are fun to make and even better to eat!

The best thing about them (in addition to their taste, of course) is that they are so very customizable. Leave out the meat for a tasty vegetarian option, or add a meat of your choice for the carnivores and omnivores in your crowd. You can mix and match your add-in’s for endless combinations, taking advantage of what’s in season as well as making multiple flavors in one batch. And you don’t have to feel guilty about these little pleasures because they are truly two-bite sized, even though they are powerfully large in flavor.

I made these above (click each photo for more detail) to take to a pot luck and they were gone within minutes. Then I started thinking about how great it would be to make them as part of a brunch buffet…my next endeavor, or possibly bake and freeze them…haven’t tried it, but I will.

This batch features caramelized onion on both versions, then broccoli and cheddar cheese in one half of the batch and sautĂ©ed mushrooms with gruyere cheese in the other. Future combos will be Italian sausage or finely chopped chorizo, red bell pepper, onion and a little grated Manchego or mozzarella cheese, and another version will feature ham and/or asparagus and parmesan cheese. What fun! It’s truly like playing with your food.

finished-1Below is the recipe for these, a variation on one of my larger quiche recipes utilizing the same custard base. Enjoy playing with these and making them your own!

***Note, I will continue to be a bit erratic with my posting as I spend time with family on and off for the next few weeks. Bear with me. One of these days I’ll get back on a more regular schedule, I promise!

Caramelized Onion, Brocoli and Cheddar Mini Quiches and Caramelized Onion, Mushroom and Gruyere Mini Quiches
Makes about 32

1 uncooked refrigerated 9-inch pie crust
1 medium sweet onion, quartered and thinly sliced
1 1/2 cups fresh broccoli crowns, blanched in boiling water for 3 minutes, drained and dried
4 ounces button mushrooms, sliced, then halved
2-3 teaspoons olive oil
Generous 1/2 cup of grated extra sharp cheddar cheese
Generous 1/2 cup of grated gruyere or swiss cheese
4 eggs, room temperature
1/2 cup 1% milk
3/4 cup heavy cream
1/8 teaspoon freshly ground nutmeg
kosher salt and freshly ground black pepper to taste

Preheat the oven to 375 degrees F. Place half of the olive oil into a large skillet heated to medium low heat, add the onions and sautĂ© until they are caramelized, about 10 – 15 minutes, stirring frequently. Season with a tiny pinch of salt and freshly ground black pepper. Remove the onions from the skillet when they a nice medium golden brown color and set aside. Add the remaining 1 1/2 teaspoons of olive oil to the skillet, then add the mushrooms, sprinkling with 1/8 teaspoon kosher salt and black pepper, and sautĂ© them over medium low heat until they are done and tender, about another 5-8 minutes. Remove the mushrooms from the skillet and set aside.

Roll your piecrust out on a floured surface as though you were planning to put it into a 9-inch pie plate, about a 14-inch round. Using a 1 1/2-inch biscuit cutter (or a water glass), cut out as many rounds as you can fit out of the rolled pie crust, saving the scraps. Roll each individual round a bit more to ensure that it will just fit into the muffin tin, then place into the tin, fully covering the bottom and sides of each depression. Gather the pie crust scraps and roll out the crust again, using the same cutting and rolling process to fill the remaining muffin tins until all of the crust is used. Layer the onions first into the bottom of each crust. Next add a tiny piece or two of broccoli floret on top of the onion to 1/2 of your total crusts. Add two to three pieces of mushroom on top of the onion to the remaining 1/2 of your total crusts. Sprinkle about a rounded teaspoon of grated cheddar cheese over each broccoli quiche and the same amount of gruyere over the mushroom quiches.

In a blender or food processor, combine the 4 eggs, the milk, the cream, the nutmeg and another small pinch of salt and freshly ground black pepper. Blend until well mixed. Pour the egg mixture over the top of the layered ingredients on all of the mini-quiches, filling to just slightly below the rim of the depression and not above the edge of the crust. (Any leftover add-ins, cheese and custard can be placed into well greased ramekins and cooked alongside the mini-quiches to make small crustless quiches. These may need a little longer to cook than the minis!) Place the filled mini quiches into the oven on a center rack and bake for approximately 20-25 minutes, until the custard is golden, puffed and just set. When the quiches are done, remove from the oven and allow them to cool in the pan on a wire rack for 10 minutes. Pop each one out carefully with a knife and serve warm or at room temperature.

*For other add-ins, just cook or prepare your ingredients prior to the layering stage, then layer them adding the cheese last, then pour the custard.

Gifts, Goodies and Greatest Hits

I have some new recipes, really I do! And some travels and adventures to share as well. And I have pictures, too. But as I am still in high gear work mode right now with some deadlines looming before the Christmas holiday, I think I’ll first take this opportunity to share these “greatest hits” of the season with you. May these favorites of mine inspire some holiday food and gift ideas for you to try until I can get back to the regularly scheduled programming.

I hope you all have enjoyed the holiday season so far, and may your days be merry and bright…and filled with good food, friends and family.

Cookies! For the cookie monster in us all.

Who doesn’t love cookies any time of year, but during the holidays they are a mandatory make and give. Starting from the top with these biscotti…this is the one thing I will try to get made before Christmas!

biscottiA-1Chocolate Hazelnut and Ginger Biscotti are perhaps the most addictive cookies ever known to man or woman. These truly decadent biscotti have the perfect dry texture combined with savory hazelnuts, spicy candied ginger and melty semi-sweet chocolate surprises in every bite. I’ve said it before and I’ll say it again…if I don’t make these for my husband every Christmas, I might as well find another place to live. I kid you not!

cookies smOld Fashioned Drop Sugar Cookies are a recipe that my mom used to make every year. They are the best I’ve ever had and fun to make by yourself, or with some little elves helping you to decorate! They have the added advantage of keeping well for a week or more in an airtight container.

crinkles2Chocolate Espresso Crinkle Cookies. I knew I had to try them the moment I saw Eva’s original recipe, and then Sawsan’s adaptation of Eva’s recipe that added some warm spices. They did not disappoint! Continue reading

Happy 4th of July! Happy Weekend!

fireworksIt’s a great day to celebrate our country’s independence, and to celebrate independence in general. We take for granted the rights we have in this country to make our own choices, and to choose those who enact those choices for us. We have the freedom to live where we want, cross our state borders freely, speak our minds and interact with the rest of the world. We should never forget that we are fortunate to be citizens of, and to live in, this country, nor forget the price and the responsibility of protecting our freedom to do so.

Today in America is all about celebrating liberty and freedom. And celebrate we will!

Here are some great dishes to share that are worthy of a celebration…or worthy of a weekend shared with family and friends. Whether you need inspiration for an appetizer, a salad, side, main dish or dessert, you can find it below. Click on the name under each image to link to its recipe.

Cheers, everyone! May those of you in the United States of America have a wonderful and safe Independence Day, and may all of you out there have a fantastic weekend.

eggs1

Deep South Deviled Eggs

You know you want one of these!

You know you want one of these!

Italian Sliders

This is what the patties should look like once off the grill, and see? They are juicy!

Sundried Tomato and Basil Turkey Burgers

Alas, another night shot which really doesn't do these justice, a wrinkle in my cloth, and my little digital camera ran out of space in the middle of shooting...plus I was hungry!

Alas, another night shot which really doesn’t do these justice, a wrinkle in my cloth, and my little digital camera ran out of space in the middle of shooting…plus I was hungry!

Easy Chicken Enchiladas Verdes

Texas Sheet Cake....you know you want it, you know you're gonna make it!

Texas Sheet Cake….you know you want it, you know you’re gonna make it!

Texas Sheet Cake

Ready for the picnic, cookout or pot luck, this salad has outdoor fun written all over it!

Ready for the picnic, cookout or pot luck, this salad has outdoor fun written all over it!

Couscous Salad

Luscious homemade peach ice cream. I mean really, can there be anything better than this? (A daylight picture perhaps?)

Luscious homemade peach ice cream. I mean really, can there be anything better than this? (A daylight picture perhaps?)

The Best Peach Ice Cream

Now THIS is a southern plate of food that makes me grin like a Cheshire Cat!

Now THIS is a southern plate of food that makes me grin like a Cheshire Cat!

Firecracker Slaw and Corn with Chipotle Butter

With such a fiesta of color, this dish just has to be good!

With such a fiesta of color, this dish just has to be good!

Betsy’s Famous Black Bean and Mango Salad

wholeplate

Betsy’s Retro Cheese Olive Bites and Bacon Wrapped Dates with Apricot and Pistachio

chickensalad4

Curried Chicken Salad

Tarragon Pecan Chicken Salad on Brioche Crostini...need I say more? But I will!

Tarragon Pecan Chicken Salad on Brioche Crostini…need I say more? But I will!

Tarragon Pecan Chicken Salad on Brioche Crostini

cornbreadtartlets2

Cornbread Tartlets with BBQ Pork, Sauce and Wickle

tart1

Crustless Summer Squash, Zucchini and Tomato “Pie”

sticksadded

Peach Melba Pops

finished plate3Mock Maque Choux

The 4th of July all wrapped up in a dessert. Happy Independence Day!

The 4th of July all wrapped up in a dessert. Happy Independence Day!

Star Spangled Peach, Cherry and Blueberry Crumble


Try, Try Again-Revival of a Favorite: Artichoke Squares

That’s what they say, if at first you don’t succeed.

Sorry to post this again, but it seems just this one previous post from earlier today may have been corrupted so that you couldn’t comment on that version. Let’s see if you can comment now on this second posting. And if you can, I shall remove the original post from the record once it’s been diagnosed. For sure, I’d never close my comments to you…I do really love hearing from you, it’s part of what makes blogging so fun! Technology is great when it works correctly. Thanks for your patience.

Bathed in that late afternoon cocktail glow.

Bathed in that late afternoon cocktail glow.

The weekend is upon us, and it’s time for a savory little nibble to go with that happy hour cocktail. Enter these delectable Artichoke Squares.

You know you want one!

You know you want one!

This is one of those throwback recipes, circa 1960 or so. I’ve updated it with some fresh ingredients, really tasty extra sharp cheddar cheese, herbs, spices and plain panko breadcrumbs instead of the canned, seasoned, Italian type.

And because I always try to use as few, or as minimally, processed foods and ingredients as I possibly can in my cooking, I decided to make my own marinade for the artichoke hearts instead of using the jarred marinated version. The result was wonderful. Fresh and clean-tasting marinated artichoke, and a commitment to marinate my own from now on for every recipe that calls for them.

Come a little closer...

Come a little closer…

But I digress. These Mad Men-worthy bites of deliciousness are the perfect companion for most any cocktail—from martinis to sweeter concoctions, with a glass of wine or a beer…and they make for some darn good eating without an adult beverage, as well. They’re rich and have a marvelous texture, so I like to cut them into small squares where I can eat more than one…or two…or three.

Now reach in and grab one or three!

Now reach in and grab one or three!

Since these Artichoke Squares can be made ahead and they freeze perfectly, they’re just right for that busy day when you need an appetizer you can pull together quickly and have ready for guests—or for yourself—pronto. Just take out what you need from the freezer, warm them in the oven on a cookie sheet and they’re ready to plate and eat. And they look pretty, too.

Cheers to the weekend!

Artichoke Squares Redux
Makes 54, some to eat now and some to freeze for later!

For the marinade:
1 teaspoon fresh lemon juice
1/4 cup rice vinegar, unseasoned
1/4 cup good quality extra virgin olive oil
1/4 cup water
1/4 teaspoon dried and crushed red pepper flakes
1/4 teaspoon kosher salt

Remaining ingredients:
1-14 oz can of artichoke hearts packed in water, drained, rinsed in water, drained again
1 large sweet onion, peeled and finely chopped
2 large cloves of garlic, peeled and minced
2 Tablespoons fresh flat-leaf Italian parsley, finely chopped
2 cups extra sharp cheddar cheese, grated (I use Cabot)
1/3 cup plain panko (Japanese style) breadcrumbs
1/4 teaspoon dried basil
1/4 teaspoon dried oregano
1/4 teaspoon kosher salt
1/8 teaspoon freshly ground black pepper
1/8 teaspoon dried and crushed red pepper flakes
4 eggs, beaten

In a small bowl, whisk together all of the marinade ingredients. Finely chop the artichoke hearts and add them to the marinade, stirring to coat them well. Allow them to marinate while you prepare your other ingredients.

Preheat the oven to 325 degrees F and lightly grease a 7 inch by 11 inch glass baking dish with olive oil and set aside. Drain the chopped artichoke through a fine meshed sieve, pressing on the artichoke, and reserving the marinade by allowing it to drain directly into a large, non-stick skillet. Set aside the artichoke hearts. Heat the marinade over medium heat, then add the onion and garlic and sauté in the marinade for about 5 minutes, until the onion is softened. Remove from heat.

In a large bowl, combine the artichoke hearts, the sautĂ©ed onion and garlic mixture with the marinade, and all of the remaining ingredients. Stir to combine well. Transfer the mixture to the prepared baking dish and smooth the surface, spreading evenly. Bake the mixture at 325 degrees F for 35 minutes. Remove from the oven and cool in the pan. Cut into small squares with a very sharp knife. Serve at room temperature or freeze the squares on a cookie sheet, then transfer to a freezer bag. When ready to use, remove what you need, warm them on a cookie sheet in a 300 degree oven, and serve slightly warm or at room temperature. These should keep a couple of months in the freezer, if they aren’t eaten first.

Revival of a Favorite: Artichoke Squares

Bathed in that late afternoon cocktail glow.

Bathed in that late afternoon cocktail glow.

The weekend is upon us, and it’s time for a savory little nibble to go with that happy hour cocktail. Enter these delectable Artichoke Squares.

You know you want one!

You know you want one!

This is one of those throwback recipes, circa 1960 or so. I’ve updated it with some fresh ingredients, really tasty extra sharp cheddar cheese, herbs, spices and plain panko breadcrumbs instead of the canned, seasoned, Italian type.

And because I always try to use as few, or minimally, processed foods and ingredients as I possibly can in my cooking, I decided to make my own marinade for the artichoke hearts instead of using the jarred marinated version. The result was wonderful. Fresh and clean-tasting marinated artichoke, and a commitment to marinate my own from now on for every recipe that calls for them.

Come a little closer...

Come a little closer…

But I digress. These Mad Men-worthy bites of deliciousness are the perfect companion for most any cocktail—from martinis to sweeter concoctions, with a glass of wine or a beer…and they make for some darn good eating without an adult beverage, as well. They’re rich and have a marvelous texture, so I like to cut them into small squares where I can eat more than one…or two…or three.

Now reach in and grab one or three!

Now reach in and take a bite!

Since these Artichoke Squares can be made ahead and they freeze perfectly, they’re just right for that busy day when you need an appetizer you can pull together quickly and have ready for guests—or for yourself—pronto. Just take out what you need from the freezer, warm them in the oven on a cookie sheet and they’re ready to plate and eat. And they look pretty, too.

Cheers to the weekend!

Artichoke Squares Redux
Makes 54, some to eat now and some to freeze for later!

For the marinade:
1 teaspoon fresh lemon juice
1/4 cup rice vinegar, unseasoned
1/4 cup good quality extra virgin olive oil
1/4 cup water
1/4 teaspoon dried and crushed red pepper flakes
1/4 teaspoon kosher salt

Remaining ingredients:
1-14 oz can of artichoke hearts packed in water, drained, rinsed in water, drained again
1 large sweet onion, peeled and finely chopped
2 large cloves of garlic, peeled and minced
2 Tablespoons fresh flat-leaf Italian parsley, finely chopped
2 cups extra sharp cheddar cheese, grated (I use Cabot)
1/3 cup plain panko (Japanese style) breadcrumbs
1/4 teaspoon dried basil
1/4 teaspoon dried oregano
1/4 teaspoon kosher salt
1/8 teaspoon freshly ground black pepper
1/8 teaspoon dried and crushed red pepper flakes
4 eggs, beaten

In a small bowl, whisk together all of the marinade ingredients. Finely chop the artichoke hearts and add them to the marinade, stirring to coat them well. Allow them to marinate while you prepare your other ingredients.

Preheat the oven to 325 degrees F and lightly grease a 7 inch by 11 inch glass baking dish with olive oil and set aside. Drain the chopped artichoke through a fine meshed sieve, pressing on the artichoke, and reserving the marinade by allowing it to drain directly into a large, non-stick skillet. Set aside the artichoke hearts. Heat the marinade over medium heat, then add the onion and garlic and sauté in the marinade for about 5 minutes, until the onion is softened. Remove from heat.

In a large bowl, combine the artichoke hearts, the sautĂ©ed onion and garlic mixture with the marinade, and all of the remaining ingredients. Stir to combine well. Transfer the mixture to the prepared baking dish and smooth the surface, spreading evenly. Bake the mixture at 325 degrees F for 35 minutes. Remove from the oven and cool in the pan. Cut into small squares with a very sharp knife. Serve at room temperature or freeze the squares on a cookie sheet, then transfer to a freezer bag. When ready to use, remove what you need, warm them on a cookie sheet in a 300 degree oven, and serve slightly warm or at room temperature. These should keep a couple of months in the freezer, if they aren’t eaten first.

Gifts a Go-Go: Homemade Chai Tea Mix and So Much More

Zooming. That’s what it feels like right now. Zooming towards the holiday at record breaking speed. Here’s a little slideshow of what I’ve been doing the last two weeks instead of posting sooner!

This slideshow requires JavaScript.

So you see, I really haven’t been ignoring anyone, just kinda busy…honestly. But then, who isn’t? So you deserve a new recipe and here it is.

I have a new gift item literally in the “mix” this year. It’s a wonderful smelling and tasting Chai Tea Mix to make and give to friends, or as a great hostess gift. It’s really an easy gift to put together, makes a seasonally colorful mixture and is endlessly customizable to suit your tastes. I’ve used a warming blend of spices that I’m particularly fond of, along with some fresh orange zest and candied ginger. Simply toast your spices, crush them to release their essence and toss with caffeinated or decaf black tea leaves and chopped candied ginger. Or you can try using an herbal tea leaf of your choice—the experimenting is up to you. I like to tie on a pretty little tea ball for brewing, or some tea bags to be filled as desired by the recipient. Here are the steps and recipe, and you can click on any image for a step by step slideshow.

Chai Tea Mix
Makes 4 pint jars full, about 12 cups of tea per jar

56 green cardamom pods, split in half with sharp knife, use pods and seeds
2 teaspoons whole red peppercorns
2 teaspoons whole black peppercorns
4 Tablespoons whole fennel seeds
2 teaspoons whole coriander seeds
2 teaspoons whole cloves
9 – 5 inch cinnamon sticks
4 teaspoons fresh orange zest, finely chopped
1 cup finely chopped candied ginger
2 cups loose leaf black tea, I used English Breakfast

Preheat the oven to 350 degrees F. Place the cardamom pods and seeds, red peppercorns, black peppercorns, fennel seeds, coriander seeds, cloves, cinnamon sticks and orange zest into two pie tins or on a cookie sheet, and toast them in the oven until they become fragrant and lightly toasted, about 5-8 minutes. Watch them carefully after 5 minutes. Remove the spices from the oven. Crush the cinnamon stick with a mortar and pestle or in a plastic bag with a rolling pin, until you have small bits but not powder, and add to a large mixing bowl. Lightly crush the remaining spices to release their essence either by mortar and pestle or rolling pin…again, you don’t want powder, just smaller pieces. Add the spices to the cinnamon, along with the candied ginger and tea, and mix well to blend. Transfer the tea mix to your jars or decorative bags.

Directions: To brew one cup of tea (and I put these brewing instructions on my tags on the jars), place one heaping tablespoon of the mix into a tea ball or empty tea bag (these can be purchased at cooking specialty stores or online, or you can make them out of coffee filters), and place into a mug. Add 1 cup of boiling water and steep for 5 minutes. Add warm milk (about 1/4 cup or to taste to start) then sweeten with sugar or honey, if desired. Enjoy!

*****

I’ll have some more great gift ideas and new items before the big holiday, at which point I will take a rest for a week to enjoy the season and spend time with family and friends.

In the mean time, please check out these links below to find the recipes for items in the slideshow that I’ve made already, and for more food gift ideas that I’ve made and previously posted on this blog. And be sure to take the time to have a cup of tea, de-stress and enjoy the season.

These are a classic!

These are a classic!

Drop Sugar Cookies and

IMG_20111224_170012_edit0Old Fashioned Ice Box Cookies
are two old tried and true recipes I love.

Then I had to make some of those addictive red pepper and fennel glazed almonds.

Then I had to make some of those addictive red pepper and fennel glazed almonds.

Red Pepper and Fennel Glazed Almonds

biscottiA-1Chocolate, Hazelnut and Ginger Biscotti
(If I make nothing else, I make these every year and I’d be in the doghouse if I didn’t!)

wholeplateRetro Cheese Olive Bites
These are great to make ahead and freeze and so are the
Bacon Wrapped Dates with Apricots and Pistachios!

bottles2Cranberry Liqueur

olives4Provençal Olives

All dressed up and ready to give!

All dressed up and ready to give!

Walnut Thyme Honey

Maamool 4Ma’amool Cookies 

*****

A Retro Spinach Dip Redo and Some Falafel On the Side

This resulted in a "Thumbs Up" from my pottery peeps and was demolished in short order!

This Retro Spinach Dip Redo resulted in a “Thumbs Up” from my pottery peeps and was demolished in short order!

Note: These two don’t really have anything to do with each other, but are both some good eats to share.

I adore Mediterranean and Middle Eastern flavors, and this week I made a huge batch of baked falafel. I had never had falafel baked before, always fried, but these were terrific in a pita alongside a Greek salad (with feta of course) for dinner, and again topping a lunch salad with tahini dressing drizzled over it. This is another of Mark Bittman’s recipes, and you can find it here. I highly recommend this as well as another recipe he lists at this same link for his Spiked Guacamole, which I made last night but didn’t photograph…it’s awesome, too! I have to say that these falafel are as good baked as those I have had fried, with a nice, crispy texture, a great taste and they freeze beautifully, too!

Drizzled and ready to eat with the tahini dressing!

Drizzled and ready to eat with the tahini dressing!

It’s been feeling very summer-ish here during the past week, and the hot weather has made me crave some cool summer dips, just for fun.  What I particularly had in mind was creating something to take to my pottery class for us to nosh on, and I came up with this Retro Spinach Dip Redo. My inspiration was born of an amalgamation of several yogurt sauces I’ve had—basically a redo of the ancient spinach dip recipe that was so popular when I was growing up. Yes, you know the one I mean, made from the vegetable soup mix combined with mayo and sour cream, served in a bread bowl?

Cool, creamy green goodness.

The result is a lighter, healthier version, that doesn’t taste “healthy” at all. While it does remind you of the old school version, it is a bit different. This one has no water chestnuts, no mayo and no sour cream, but it does have a great mouth feel, and lots of texture and flavors that build as you eat it. Plus, it’s almost as easy to make as the soup mix version, but it’s much better for you! And here’s a little trick: Whenever you combine olive oil with plain yogurt, it emulsifies the yogurt, giving it more of a mayonnaise-like texture and making it less likely for the water to separate. This is a great tip for making tzatziki sauce, too.

The verdict from my pottery class (my test subjects) was that this is a winner, so I promised to share my Retro Spinach Dip Redo on the blog. Enjoy, and I hope that your week has started off swimmingly!

Retro Spinach Dip Redo
Makes about 2 1/2 cups

2 very large shallots finely chopped
1 large clove of garlic, grated
1 1/2 Tablespoons of Extra Virgin Olive Oil
1-10 oz. package of frozen, chopped spinach, preferably organic, cooked according to the package directions (I microwave mine), then drain it and press all the moisture out
1/2 teaspoon Kosher salt
Several grinds of fresh black pepper
1/2 teaspoon of ground coriander
1 3/4 cups of plain Greek yogurt, whole or 2% (I used 2% Fage yogurt)

Put all ingredients in a small bowl and combine until well mixed. Place the dip into the fridge and let the flavors blend for an hour or two. Transfer to a serving bowl and serve with pita or tortilla chips, or raw veggies if you like!

rose1On another note, this is a rose bush my husband gave me many years ago for Valentine’s Day. It has struggled in our front yard all these years, tolerating the drought and maybe giving me one beautiful rose each year…sometimes two when I’m lucky. This year, it has 7 blossoms on it! I think it likes all the rain.

Sadly, I can't remember the name of this rose, but I think it is a tea rose...sweet thing!

Sadly, I can’t remember the name of this rose, but I think it is a tea rose…sweet thing!

*****

Back in the Saddle, er, Kitchen, with a Retro Dip!

I can trick myself into believing I'm eating a salad when I serve this with veggies!

I can trick myself into believing I’m eating a healthy salad when I serve this with veggies!

I hope you all had lovely holidays and that your new year has started off swimmingly!

This first full weekend of 2013 finds me back in my kitchen (yay!) with the almost full use of both hands. The bandage is off of my injured right hand and it is getting back to normal. One more week of treating it with kid gloves, so to speak, and I think all will be well. Meanwhile, I’m able to do some slow chopping and other basic cooking necessities as long as I don’t twist or put too much pressure on it. Thanks for all your wonderfully kind comments and inquiries. Believe me, I will go out of my way to try to NOT do this again.

Today I want to revisit and share a relatively easy and very yummy dip recipe from my “repertoire.” For those of you who are football fans, this is a great one to make for the upcoming American football and Super Bowl game parties, or down the road a way for rugby, soccer or baseball gatherings. It’s always been a hit for pot-lucks, Formula One racing parties and as a part of any appetizer spread. It’s definitely a rift on an old-fashioned traditional dry soup-based dip that we’ve all known in this country (and secretly loved), but transcends the original in every way. Yes, we’re talking about the ultimate chip and veggie dip: Caramelized Shallot and Blue Cheese Dip, and I’m making it to take to a little cocktail and nosh event this evening.

For those of you who follow this blog closely, you’ll remember a mention of this dip from my two party posts last summer, Party On! and Encore (More party recipes), and those posts get another mention now because they have a lot of other great ideas for appetizers of various kinds to keep in mind for these seasonal bowl game parties. This fabulous dip is from a Bon AppĂ©tit recipe, and it’s one that never disappoints or gets old. I’ve adapted it ever so slightly from the original, adding more shallots and blue cheese (can you ever have too much, I ask ya?) for extra flavor, used a lighter mayo and some added seasonings. Here’s my version and you can see the original recipe at Epicurious if your click on the dip name above. Have a great weekend!

Warning: Do not make this unless you have someone to share it with. It is addictive.

Hmmm. Those shallots kind of look like some sort of weird college logo, don’t they?

Caramelized Shallot and Blue Cheese Dip (adapted from Bon Appétit)
Makes 2 generous cups

Start this in time to allow the flavors to blend for a couple of hours before serving.

2 cups thinly sliced shallots (about 7 ounces)
1 Tablespoon of olive oil
3/4 cup good quality mayonnaise (you can use light or canola mayonnaise)
3/4 cup sour cream (you can use light but do not use non-fat)
5 oz. Maytag Blue Cheese, or other crumbling variety of blue cheese, allowed to come to room temperature
Salt and some freshly ground black pepper to taste (remember, the cheese adds a little salty component, too)
*If you like some spice you can use a tiny pinch of cayenne instead of, or in addition to, the black pepper

shallots after

Your caramelized shallots should look like this.

Heat the olive oil in a heavy, medium saucepan over medium low heat. Add the shallots and cook, stirring occasionally, until they are a deep golden brown in color and caramelized, about 15-20 minutes…do not burn. Remove from the heat and set aside to cool.

In a medium bowl, combine the mayonnaise and the sour cream until well blended. Add the blue cheese and mash it into the mayo mixture with the back of a spoon or a rubber spatula until it is well blended. Add the caramelized shallots and mix well. Add the salt and pepper to taste or the cayenne if using. Remember, the flavors will build. Cover and place in the fridge for a couple of hours or overnight. Taste and season again if needed. Serve with veggies and/or chips.

Confession: There's a big 'ole bowl of regular and sweet potato chips off to the side here.

Confession: There’s a big ‘ole bowl of regular and sweet potato chips in the wings awaiting this dip!