Light Individual Chicken Pot Pies for Spring!

Plated2 copy2Spring is in the air and I have one more recipe in a lighter vein to share with you as we usher in this beautiful and transitional season. Chicken pot pie!

I really love chicken pot pies any time of the year and I especially love individual ones because you can have a reasonable portion that is just right. Since these pies aren’t the quickest thing to make, it’s wonderful to freeze some of them and then enjoy those goodies at a later date for a quick weeknight dinner. Just thaw, top with your favorite crust, bake, add a salad on the side and you’re good to go.

This particular version of the dish has been lightened up a bit by cutting back on the fat and amping up the vegetables—some of which are roasted, giving them an extra boost of flavor. The filling is still creamy and rich tasting, but uses only a touch of olive oil and butter for flavor, flour to make a roux and some homemade unsalted chicken stock and low fat milk instead of cream to make the sauce. The taste of the sauce is additionally enhanced by a dash of cayenne pepper for a little kick. (You can cut back on the cayenne or eliminate it completely if you are heat sensitive.)

I roasted a whole organic chicken for the meat and made my stock from the carcass, which you can see how to do by clicking on this post. Homemade stock adds unbelievable flavor and richness to any dish, and is well worth the effort. Really there isn’t much effort…you just need to give it a couple of hours on the stove, then cool and strain it. Extra stock freezes well and is really nice to have on hand. You can also buy a pre-roasted organic whole chicken at your grocer and make stock from the carcass, or use a purchased good quality low or no sodium stock to save some time.

outofoven1 copy
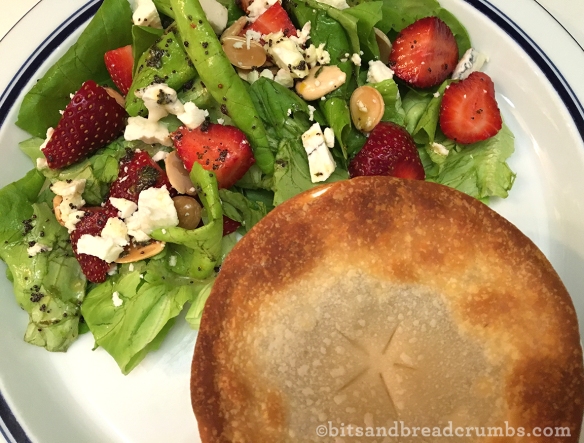
I made a biscuit topping for the pies in the post I linked to above, but this time I used a bit of puff pastry to top my first round, then topped the pies I froze and thawed later with a purchased refrigerated pie crust just before baking. Any of these options will make a delicious and very satisfying result. My only regret is that we’ve now gone through all of the pies in the freezer, which were as good as freshly made. Time to make some more!

This recipe definitely lends itself to a vegetarian version by substituting another hearty veggie like butternut squash for the chicken, and by using homemade vegetable stock. Enjoy these pies with a spoon to sop up every last bit of the sauce!

Happy Spring!

Light Individual Chicken Pot Pies
Serves 10
Freezes beautifully without crust

small uncooked red potato(es), 1/2 inch dice
1/2 lb. uncooked green snap beans, trimmed and snapped into bite sized pieces
Tbsp olive oil
Tbsp unsalted butter
large uncooked onion, diced
2 large ribs uncooked celery, sliced
large uncooked carrots, peeled and diced
oz. fresh mushrooms, wiped clean and quartered
cloves garlic, minced
tsp kosher salt
1/2 tsp freshly ground black pepper
Tbsp all-purpose flour
cups unsalted home-prepared chicken stock or other unsalted chicken stock
1/2 cup low-fat milk
2 1/2 cups roasted skinless chicken breast and thigh, diced
1/4 tsp cayenne pepper
Tbsp fresh flat leaf parsley, finely chopped
1 1/2 tsp fresh thyme leaves, chopped, plus extra for sprinkling on top
Additional salt and pepper to taste
servings Dufour Frozen Puff Pastry (about 1/2 of one sheet in a 2-sheet, 14 oz. package) OR refrigerated pie crust (you’ll need two of them for 10 rounds)

Preheat the oven to 400 degrees F. Lightly spray 10 one cup ramekins with cooking or olive oil spray.

Step 1: Make two aluminum foil trays and place on a rimmed cookie sheet. Place the potatoes in one tray and the green beans in the other. Season lightly with salt and pepper and roast until tender and lightly browned, about 20 minutes for the potatoes and 15 minutes for the beans, stirring once. Remove from the oven and set aside.

Step 2: Heat the 1 tablespoon of butter and 2 tablespoons of olive oil in a large skillet over medium heat. Add the onions, celery and carrot and sauté for about 4-5 minutes. Add the mushrooms, garlic, a little pinch of salt and cook, stirring frequently for 5 minutes. Stir in the 5 tablespoons of flour and stir continuously for about 4 minutes to cook the flour and make a light roux. Add the chicken stock, stirring, and bring the mixture to a boil. Reduce the heat to simmer and cook another 5 minutes or until the sauce begins to thicken, stirring occasionally. Stir in the milk, then simmer another 4 minutes. Add the potatoes, green beans, chicken, cayenne, salt, pepper, parsley and thyme. Stir well to combine. Taste for seasoning and add more salt and pepper if needed. Divide the filing evenly amongst the 10 prepared ramekins. If freezing any pies, allow the filling to cool in the ramekins, then cover them with plastic wrap and place into the freezer on a flat surface. Once frozen, place the covered ramekins into a freezer bag. Thaw before using and then proceed to step 3.

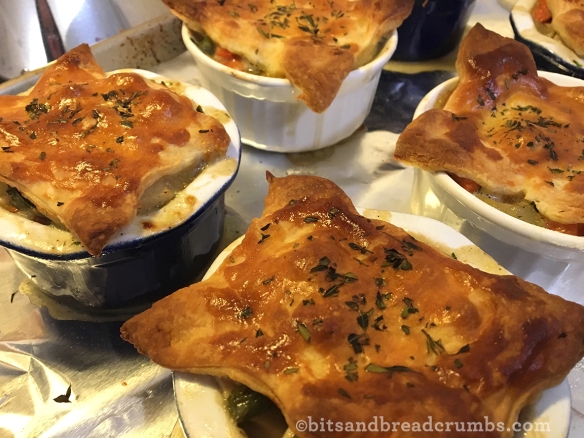
Step 3: Thaw and roll out the pastry according to the package directions. Cut the pastry with a knife into 10 equal portions if using puff pastry, or if using pie crust make 10 slightly larger rounds to fit over your ramekins and pierce them to vent. Place one portion on top of each of the 10 pies, securing the edges of the pastry around the edge of the ramekin. Brush with a little whisked egg wash and sprinkle with some chopped thyme, if desired.

Step 4: Line a cookie sheet with aluminum foil. Place the ramekins on the foil, evenly spaced, and place the pan with ramekins into the oven. Cook the pies in a 400 F. degree oven for about 20 – 25 minutes, or until the chicken filling is simmering and the pastry is puffed, cooked through and golden brown on top. Watch carefully and if your pastry starts to get too brown, cover it with some aluminum foil. When done, remove from the oven and allow to sit for about 5 minutes before serving. Decorate with a bit of chopped fresh parsley and serve with a green salad on the side, if desired. This makes ten servings, and leftovers will keep well for a day in the fridge and can be reheated in the microwave.

This slideshow requires JavaScript.

A Lighter Vichyssoise or Creamed Leek and Potato Soup

soupcu1Want another quick, simple, delicious and lighter soup recipe? This is a “lightened up” fix for an easy favorite…vichyssoise, or leek and potato soup. My lighter version is pureed and creamed, much like the original, but with a simple sub of lightened sour cream instead of copious amounts of heavy cream, you can definitely cut back on the calories and fat without sacrificing the flavor.

I think you’ll find that the sour cream adds a slight tang that naturally complements the leeks and the potato. This version is a little thicker, but is just as velvety as the original. Depending on how starchy your potatoes are you may wish to thin the soup with a bit more broth or water after you puree it. You could even use Greek yogurt as a substitute for the sour cream, but I happen to like the body and smoother consistency that the sour cream provides.

Like the traditional vichyssoise, this soup comes together incredibly quickly and is good hot or cold, which means you can eat it all year long…although this winter we’re leaning towards hot! It’s great to make on a busy weeknight. And it keeps well in the fridge for up to three days. All-in-all it makes for a warming (or chilled) and filling bowl of satisfying soup. We like ours with a bit of cheese toast alongside, which one can righteously enjoy when one has eliminated heavy whipping cream from the ingredients!

If you’ve never made vichyssoise because the name sounded “difficult,” you should really give it a try. What could be easier than throwing these few raw ingredients into a pot, cooking it for 40 minutes, pureeing it with a stick blender and stirring in some sour cream? You won’t be sorry.

Don’t need to worry about fat and calories? Then you can’t beat the original version of Julia Child’s vichyssoise here.

Lighter Vichyssoise or Creamed Leek and Potato Soup
Serves 6

4 cups sliced leeks, cleaned well, white and light green parts only (about 3-4 leeks)
1 3/4 lbs. raw yukon gold potatoes, cleaned, peeled and sliced
6 cups unsalted chicken broth
4 oz. water, plus a bit more for thinning, if needed
1/2 cup light sour cream, not fat free
1 teaspoon kosher salt
1 teaspoon freshly ground black pepper
2 tablespoons snipped fresh chives (for garnish)
additional salt and pepper to taste

Place the leeks and potatoes in a large stock pot, add the broth, 1 teaspoon of salt and the water and bring to a boil. Reduce the heat to a simmer and cook partially covered until the vegetables are tender, about 40 minutes. Remove from the heat and puree with a stick blender until very smooth. Return the soup in the pot to low heat. Stir in the sour cream, black pepper and add any additional salt, to taste and heat through. If the soup is too thick for you, thin it with a bit more broth or water. Serve the soup hot or cold with fresh snipped chives sprinkled on top as a tasty garnish.

soupcu2

Happy Valentine’s Day!

molten chocolate cake2This is one of my favorite sweet treats to make for Valentine’s Day or any occasion requiring a spectacular dessert. Molten Chocolate Cake. It’s easy to make and you can still make it for your Valentine this evening. It can also be made one day ahead and placed in the fridge, then brought to room temperature and baked when needed. I like to add just a touch of cinnamon to my batter for a little spicy warmth, and use vanilla bean ice cream on top. Make 1/3 of the recipe for two, if that’s where you’re headed. This isn’t my recipe, but it’s one I use over and over again, and I highly recommend it! You can find the recipe by clicking here.

Need more quick Valentine’s ideas?

Coeur a la creme by candlelight...very romantic!

Coeur a la creme by candlelight…very romantic!

Coeur à la crème click here.

Milk Chocolate and Orange Pots de Creme for dessert!

Milk Chocolate and Orange Pots de Creme for dessert!

Milk Chocolate and Orange Pots de Crème click here. Just add a little orange zest to make my version.

flowers

Hope you have a lovely day one and all!

Spinach, Mushroom and Artichoke Strata

plated2BsharpHere’s a revamp of one of my favorite comfort foods to enjoy, particularly in cold weather: The Strata.

A Strata is much like a bread pudding…in fact the ingredients are almost the same. In my mind the main difference lies in layering versus mixing the whole together, along with the proportions of egg to milk or cream. The strata is “egg-y,” and the bread pudding has more of a “custard-y” quality. Because of these slight variations, the two are actually a bit different in both texture and taste.

The strata allows you to use thinner pieces of bread and fewer pieces as well, which are then layered with other ingredients. You add just enough moisture from the eggs and milk to hold it together, then top it with cheese. The result is sort of a baked sandwich with a fluffy texture. A bread pudding heavily relies on thick cut or torn chunks of bread soaked in a lot of custard to give the finished product a true pudding texture. Traditionally, bread puddings can be sweet or savory, but strata are most always savory.

And much like the frittata you saw in my last post, you can customize your strata to suit your taste or to accommodate what you have on hand by changing the type of bread, filling and cheese. In the end, the lines between strata and bread puddings can be blurry for sure, but the results are always delicious! And often quite caloric…which brings me back to the “revamp” part of this post.

Outoftheovenbest

Given that I am trying to continue the idea of “leaning up” some recipes without sacrificing flavor and texture, I came up with a modified strata, one that’s jam-packed with veggies. But it’s not just lots of veggies that provide the revamp. I’ve also used a flavorful multi-grain and seeded sliced prairie bread as the base, lower fat milk instead of cream, added some sweet spice, a hint of sherry and just a little bit of strongly flavored cheese to round out the taste and mouthfeel. I can tell you that the result is wonderful!

As I said, this leaner version is much more healthful than my usual savory bread puddings. With the adjustments I’ve made, I’d say this strata has 1/2 of the calories and fat, but all of the homey comfort food quality that I have always loved. It’s a meal unto itself and can be served for breakfast, lunch or dinner. You could also enjoy it with a fruit salad, if you like. This reheats well in the microwave, too, so even if there’s just one or two of you around to eat it, leftovers can be kept in the fridge and used as needed. I haven’t tried freezing it because we eat it up quickly, but I think it would freeze well.

aftercutting

Spinach, Mushroom and Artichoke Strata
Serves 6

1 teaspoon olive oil
1 large onion, peeled and diced
8 oz. fresh mushrooms, cleaned and sliced
a pinch of salt and pepper
1 teaspoon of dry sherry
1 teaspoon of minced fresh thyme leaves
8 slices of prairie bread (I use Whole Foods, but a good quality multi-grain and seeded bread will do)
5 oz. of fresh baby spinach, cleaned and coarsely chopped
1 1/2 cups coarsely chopped frozen and thawed cooked artichoke hearts
4 large eggs
2 cups 1% milk
1/2 teaspoon freshly ground nutmeg
1 teaspoon kosher salt
1/2 teaspoon freshly ground black pepper
4 oz. of gruyere cheese, shredded
Olive oil cooking spray for the pan

1. Spray a 7 inch by 11 inch glass pyrex casserole with olive oil and set aside.

2. In a non-stick skillet over medium heat, warm the 1 tsp olive oil and then add the chopped onion. Sauté until the onion is tender, translucent and just beginning to caramelize, then add in the mushrooms and cook until they are tender and most of their moisture has evaporated. Sprinkle the mixture with a tiny bit of kosher salt and freshly ground black pepper, the fresh thyme and the sherry. Stir to combine. Remove from the heat and set aside. Line a baking sheet with foil. Lay the slices of bread on the sheet and preheat your broiler. Lightly toast the bread on both sides, remove from the oven and set aside. Turn off the broiler and preheat the oven to 350 degrees F. In a large bowl, whisk together the eggs, milk, nutmeg, 1 teaspoon of salt and 1/2 teaspoon of pepper.

3. Assembly: Dip each piece of toasted bread into the custard mixture to fully coat it, then arrange each slice of the coated bread in the casserole slightly overlapping like a deck of cards. Pour the remaining custard mixture evenly over the bread. Tuck the cooked onion and mushroom mixture, chopped spinach and chopped artichoke hearts in evenly in between the slices. Sprinkle the gruyere cheese over the top and lift the slices with a spatula to allow some of the cheese to slip in between. Press down on the strata to even it out and to allow the bread to soak up the custard.

4. Place the dish with the strata onto a foil-lined cookie sheet to catch any drips. Put it into the oven and bake for about 45 minutes at 350 degrees F., or until golden brown and just set. After 45 minutes if it still need more time, cover lightly with aluminum foil to prevent over browning and continue to cook for 10 more minutes or until done. The strata is done when it is golden brown on top, slightly puffed and a knife inserted into the middle comes out clean, without egg. Remove from the oven. Cut into 6 pieces and serve. Leftovers will keep in the fridge for 3 days.

This can be made the night before, covered and placed into the fridge. Allow it to sit at room temperature for about 20 minutes before baking. Remove covering and proceed as above.

*****
snowynight2
We enjoyed this strata on a blustery and snowy night…a rare thing in our parts. But you don’t have to wait for some snow to warm up to this recipe!


Broccoli, Mushroom, Onion and Cheddar Frittata

Just out of the ovenWith the new year comes the resolutions, and one of them is always to try and “lean up” a bit after normal eating goes by the wayside in the total decadence of the holidays.

I am one who always has, and always will, fight the good fight with my waistline. We hike every weekend that the weather will allow this time of year, and that’s not only a fun way to get exercise and destress after the work week, but also a healthy and happy penance to other weekend pursuits! Still, one cannot lose weight by exercise alone…and there’s the rub.

It won’t come as a shock to you that I love to eat and won’t be giving up that pleasure any time soon. But there are ways to eat what you want and not gain, or even better, actually lose some weight.

Enter the frittata. What’s not to love about a frittata? You can make one in a snap and you can use up leftovers in your fridge to do it. Frittatas can be made out of most anything as long as it goes with eggs. Frittata is my go-to dish for those nights where I don’t have a lot of time in the kitchen and I want something good, filling and comforting to eat.

My approach to frittata has changed over the years and if you’ve followed this blog for a while, you’ve several versions posted. I began on one end of the spectrum with lots of egg and cheese, with only a few other ingredients added in. Then after reading some of Mark Bittman’s approaches to getting more vegetable and less animal into one’s diet, I switched to the other extreme, which was almost all vegetable and very little egg. Tasty and messy, but not quite as satisfying and “frittata-like” as where I’m landing now. Since eggs have been vindicated and are back in the “good for you” department, this frittata is filled with eggs. And vegetables. And just enough cheese to taste and enjoy. I think it’s perfect. I hope you will, too.

First I roast the broccoli and the mushrooms with no oil, just adding a bit of salt and pepper for seasoning. This results in concentrating the flavor of the vegetables and bringing out a nuttiness in the broccoli which only roasting can do. Then, I use a tablespoon of olive oil in my cast iron skillet to lightly caramelize the onion before adding the roasted broccoli and mushrooms to the party. Eggs are whisked in a bowl with salt, pepper and a goodly dash of freshly grated nutmeg. The nutmeg is really key here because it does two really wonderful things to the frittata. It brings out the natural sweetness of the eggs and the parmesan cheese, and boosts the flavor of the veggies. Lastly, I whisk in equal amounts of full fat shredded extra sharp cheddar and freshly grated parmigiano reggiano cheeses into the eggs, but only just enough for the taste…1/2 cup combined for the whole dish. Pour the egg mixture over the veggies, pop the skillet into the oven for about 12 minutes and you’ve got a healthy, filling dinner entree with very little fat, but lots of protein and veggies. It’s pure gold. Or at least it looks like that in these night time shots!

Another thing to love about frittata? Leftovers, if you have any, keep well in the fridge for up to 3 days. Love.

Happy New Year to you all and I hope yours has started off well. Here’s to your good health…and resolutions!

*****

Below is a little taste of an all too short hiking trip we took for our anniversary in November after Thanksgiving. This is the truly spectacular Falls Creek Falls State Park in the Cumberland Plateau area of Tennessee. A gorgeous, 35,000 acre park with trails, a lake, boating, zipline, fishing, cabins and an inn with a small restaurant, horseback riding and more. Since this was off season and winter, it was rainy and only the trails and accommodations were open, along with the restaurant, but it was still so beautiful and I can imagine it would be any time of year. We will go back for sure!

This slideshow requires JavaScript.

Broccoli, Mushroom, Onion and Cheddar Frittata
Serves 6

Two heads of broccoli crowns, washed and cut into small florets (about 4-5 cups)
8 oz. button mushrooms, cleaned and quartered
1 large onion, peeled and diced
1 Tablespoon of good quality olive oil
10 large eggs
1/4 cup shredded extra sharp cheddar cheese (I use Cabot)
1/4 very finely grated Parmigiano Reggiano cheese
1/4 generous teaspoon freshly grated nutmeg
1/2 teaspoon kosher salt
1/2 teaspoon freshly ground black pepper
more salt and pepper to taste

Preheat the oven to 400 degrees F. Line a cookie sheet with aluminum foil, then make an aluminum foil tray with sides to go into half of the sheet. Place the broccoli florets on the covered sheet and the mushrooms inside the tray. Season the broccoli and the mushrooms with the 1/2 teaspoon salt and pepper, dividing evenly. Place the sheet with tray into the oven and roast for approximately 15 minutes, stirring each side once halfway through, until the mushrooms are tender and the broccoli is cooked through and just starting to brown a little bit. Remove from the oven and set aside.

Crack the eggs into a medium-sized bowl and whisk to combine. Whisk in the nutmeg, a pinch of salt and some freshly ground pepper. Add the two cheeses and whisk to combine.

Heat the oil over medium heat in a 10 inch cast iron skillet. Add the onions and cook for about 4-5 minutes, until they are translucent and just starting to caramelize a little bit. Add the roasted broccoli and the mushrooms and toss together, warming for about 2 more minutes. Pour the egg mixture evenly over the veggies, lifting the veggies gently to allow the egg to run underneath. Place the skillet into the 400 degree oven and cook for about 12 minutes, until the top is just barely set in the middle and firm on the edges. Remove from the heat and allow to sit for about 4 minutes. Cut into six wedges and serve.

Happy New Year!

May you enjoy peace, prosperity and good health in 2016, and may all of your fondest dreams come true. Happy New Year to you and yours!

Cookies for Santa and a Merry Christmas to All!

Did someone say "Catfoodie"???

Jingle…jingle…jingle. I hear those sleigh bells jing-a-ling, ring-ting ting-a-ling, too! Christmas is almost here and you know what that means, right? You’ll be needing some cookies for Santa and his reindeer on Christmas Eve this Thursday. Here are some ideas for last minute Christmas cookies that are sure to please even the pickiest elf or reindeer.

biscottiA-1

Chocolate, Ginger and Hazelnut Biscotti

These are a classic!

Mom’s Drop Sugar Cookies

Mmmm. These Glazed Apple, Walnut and Oatmeal cookies are to die for! Mmmmuuuuaaaah ha ha ha ha!

Fresh Apple and Walnut Oatmeal Cookies with Sweet Cider Glaze

Maamool 4

Ma’amool Cookies

crinkles2

Chocolate Espresso Crinkle Cookies

Yes, may I have another?

Toffee Bars

plated4

Spiced Oat and Chocolate Chip Blondies

cinders1sm

Waiting for Santa…

*****

Need more holiday entertaining or food and beverage gift inspiration? Check out this previous post: Gifts, Goodies and Greatest Hits

wpid-IMG_20111225_083829.jpg

To all of those who celebrate, I wish you a joyful and Merry Christmas!
See you in 2016!

‘Tis the Season for a Quick and Festive Spinach and Feta Spread

IMG_2551smIt’s less than two weeks until Christmas and less than 3 weeks before a new year arrives! Where has the time gone?

In this busy and festive holiday season, it’s so nice to have a few tricks up your sleeve for last minute holiday entertaining. Along those lines, here’s a versatile savory spread and dip that comes together in a flash, is loaded with delicious flavor and looks very pretty, too. In fact, this vibrant green Spinach and Feta Spread has “party” written all over it.

As a make-ahead spread or even a last minute decision, it can’t be beat in terms of speed and ease of prep. There is no cooking involved at all. Just toss all of the ingredients into a food processor, blitz it until smooth and eat it right away or cover with plastic and keep in the fridge until your guests arrive. You can serve it in a pretty ceramic or crystal bowl alongside some sliced baguette and crackers, or make toasted crostini topped with some spread, a little sprinkle of crumbled feta and a few slivers of spinach leaves. It can also be served at room temperature as a dip with crudités. Even if you don’t want to make this for a party, it’s a delectable sandwich spread. Lovely.

Fully loaded freezer! Save even more time by writing the baking instructions on your packages.

So what else do I have up my sleeve this holiday season? These tried-and-true party appetizers and ice box cookies are just the ticket for busy working folks and would-be party hosts. Retro Cheese Olive Bites, Bacon Wrapped Dates and Old Fashioned Ice Box Cookies can be made ahead and are already in my freezer just waiting to be quickly baked and plated, then served at a gathering of friends and family. I made all of these in the span of a late afternoon one weekend…about 3 hours total. And now I’ve got a party in the freezer. Even Santa’s elves can’t beat that for productivity!

cookiesgreen

Old fashioned ice box cookies are wonderful to have on hand. You can take out what you need, slice and bake in a snap. Click here for the recipe and this year I’ve added the zest of one orange to my dough…making them even better!

wholeplate

It wouldn’t be a party without my Retro Cheese Olive Bites and these amazing Bacon Wrapped Dates stuffed with pistachios and apricots from Martha Stewart.

In addition, Mom’s drop sugar cookies cannot be beat! If you have some extra time on your hands, these are THE BEST and fun for kids of all ages to decorate, too. You can find that recipe by clicking here.

Happy Holidays, indeed!

IMG_2551sm

The color of this quick and savory Spinach and Feta Spread is delightful.

Festive Spinach and Feta Spread
Makes 2 cups

2.5 ounces (1/2-5 oz. bag) raw baby spinach
6 ounces crumbled feta cheese
8 ounces cream cheese, softened to room temperature
1 clove of garlic, peeled and chopped
1 teaspoon fresh lemon juice
1/4 teaspoon kosher salt
1/2 teaspoon freshly ground black pepper
1/2 teaspoon no salt pasta seasoning or Italian seasoning blend (I use Trader Joe’s)

Combine all ingredients in the bowl of a food processor and pulse to break up the spinach. Process until smooth and creamy as above. Place in a bowl, cover with plastic wrap and refrigerate for about 15 minutes or more to allow the flavors to blend. Serve with crackers, baguette and/or crudités.


Happy Thanksgiving!

To all who celebrate in the United States and our citizens abroad, may your day be filled with blessings, abundance and the joy of family and friends. 

Refrigeration Inspiration and a Little Surprise!

It’s that night time shot time of the year again!

A few weeks ago I heard a segment on public radio that I found jarring even though it wasn’t really news to me. It spoke about how much food is wasted or thrown away in the United States. Tons and tons.

No matter how conscientious well all try to be, I think at one time or another, many of us have found ourselves purchasing or even growing more food that we can use or give away. Sometimes it goes to waste because we’re too busy to use it for it’s original intended purpose or recipe. Sometimes it’s because we’re so busy we forgot about the food entirely. While I always try to keep in mind what I have in my fridge and use it up, occasionally it goes to my compost to recycle back into the garden. Better than a total waste, but still not ideal.

However, other times those forgotten contents in my refrigerator become the sole inspiration for what I cook.

I recently opened my fridge to find I had a plethora of arugula, two sad zucchini, some wilting shallots, a large carton of grape tomatoes going south, some rapidly aging brussels sprouts and a couple of portobello mushroom caps mushing it up in my fridge. “So,” I said to myself, “what can I make to use up all of these ingredients fast this week before they become an, er…experiment?”

Following in the answer in the form of my resulting recipes. They start with a wonderfully bright arugula pesto and build on that with 3 easy and delicious meals that provide a little something for everyone. In fact, many of these dishes would make great additions to a holiday table. I hope these recipes will inspire you to dive into the depths of your fridge, think creatively and come up with some tasty saves for those forgotten ingredients and leftover food items that lurk there!

*****

And here’s my little surprise:
Early this summer I was hired to write my first 450 word food article for a magazine! I’m pleased to share this link to my article on chili beers for use in cooking as well as for pairing with food, featured in the Fall issue of The Beer Connoisseur, a premium web magazine on the BeerConnoisseur.com site. You can read the article and see one of the my recipes at this link, then see the rest for a $2 subscription to the issue or a full subscription to the magazine. It’s an informative and website, chocked full of tasty craft beer, food and travel. I hope you’ll enjoy this little taste for free. Cheers!

*****

This slideshow requires JavaScript.

Even though I know better I tend to limit my thinking to “Basil = Pesto.” Not true, and this time of year that’s especially not true when greens like arugula and kale are in season. The peppery arugula makes a delicious and very versatile pesto as you will see. And unlike basil pesto, arugula pesto keeps retains its bright green color. This is now my “cold weather” pesto of choice.

Arugula Walnut Pesto
Makes about 1 1/4 cup

4 cups baby arugula packed, coarsely chopped
1/2 cup extra virgin olive oil
1/3 cup coarsely chopped walnuts
2 cloves of garlic, chopped
1/2 cup finely grated parmigiano reggiano cheese
1 teaspoon kosher salt

In a food processor or blender, combine the first 4 ingredients and puree until smooth. Transfer the sauce to a medium-sized bowl and stir in the cheese and salt by hand. Any pesto not used immediately can be covered with plastic wrap touching the top of the sauce and another piece of plastic wrap covering the bowl, then refrigerated for several days. You can also make pesto with another green or herb of your choice and nut of your choice, but this combo is dynamite.

*****

pastafinished1BThe ridged cavatappi pasta makes a perfect foil for this pesto-based dish. Best of all, it comes together quickly! Pass some extra cheese if you must…I understand.

Cavatappi with Arugula Pesto, Roasted Tomatoes and Zucchini
Makes 4-6 servings

16 oz. grape tomatoes, split in half lengthwise
2 medium zucchini squash diced to 1/2″
2 tablespoons extra virgin olive oil
12 oz. dry cavatappi pasta, penne or other hollow pasta with ridges
1/2 to 3/4 cup arugula pesto, or more to taste
Kosher Salt and freshly ground pepper to taste
1/3 cup reserved pasta cooking water

Preheat oven to 375 degrees F. Line a baking sheet with foil, then make a foil tray with the sides folded up that is 1/2 the length of the baking sheet. Place the tomatoes into the tray and the zucchini into the flat space on the sheet beside the tray. Divide the olive oil evenly between the tomatoes and the zucchini and toss to coat. Sprinkle the tomatoes and the zucchini with a pinch of salt and freshly ground pepper. Place the sheet into the oven and roast the vegetables until just beginning to brown and soften, about 20 minutes, stirring halfway through the roasting time.

While the veggies roast, bring a pot of water to a boil and cook the pasta according to the package directions for al dente. When the veggies are done and the pasta is al dente, drain the pasta reserving 1/3 cup of the cooking liquid and return it to the pot. Add the roasted vegetables and any collected juices to the pasta, then gently stir in the pesto. If the sauce and the pasta need to be more moist, add some of the cooking water a little at a time and stir, just until you have the sauce the way you like it. Season to taste with more salt and pepper if needed and serve.

*****

pork chop 2

Really easy to prepare chops. Keep an eye on them and use the cooking time as a guide and you’ll have nice, flavorful and juicy chops. The Brussels sprouts below can roast alongside in the same oven if desired, just check them separately.

Simple Herbed and Baked Pork Loin Chops with Arugula Pesto
Makes 2 servings

2 – 6 or 8 ounce thick cut (about 1 inch) boneless pork loin chops
1 small clove of garlic, mashed with the flat side of a knife
1/4 teaspoon kosher salt
2 teaspoons of olive oil
1 teaspoon each of finely chopped fresh sage, rosemary and thyme
1/4 teaspoon freshly ground black pepper
2 tablespoons arugula pesto to serve

Preheat oven to 350 degrees F. In a small bowl, combine all ingredients except the pork to form a paste. Evenly divide the paste between the two pork chops and rub them all over to evenly distribute the seasonings. Heat a cast iron skillet over medium high heat. Place the pork chops in the skillet and sear them on each side, turning once, until you have a nice golden crust, about 3-4 minutes per side. Remove from the heat and place into the oven. Bake for about 20 – 25 minutes until the chops are just done through or the thickest part registers 155 degrees, watch carefully and check so as not to overcook. Remove from the oven, cover lightly with aluminum foil and allow the chops to rest for 5-10 minutes. Serve each chop with 1 tablespoon of arugula pesto on top or alongside.

*****

brusselssproutsEven if you think you don’t like Brussels sprouts—and I can see why because I hated them for years until I tasted this cooking method—you should give these a try. The dark crispy edges and sweet caramelization that happens to these by simply roasting them, transforms them into…well, almost a snack!

Simple Roasted Brussels Sprouts
Makes 4 servings

1 lb. raw small fresh Brussels sprouts, trimmed of wilted leaves and stem, then cut in half
1 Tablespoon extra virgin olive oil
1/4-1/2 teaspoon kosher salt
1/4-1/2 teaspoon freshly ground black pepper

Preheat oven to 350 degrees F. Line a baking sheet with foil and lightly oil it. Place the cut Brussels sprouts onto the prepared sheet, drizzle evenly with the olive oil, then sprinkle salt and pepper to taste. Toss together with your hands to combine and spread the sprouts evenly in a single layer on the sheet. Place in the oven and roast for about 25 to 30 minutes total, stirring once, until the sprouts are tender and have dark brown caramelization spots as shown in the photos. Remove from the oven and serve.

*****

I forget how much I love a good stuffed portobello mushroom. In addition to making use of my forgotten fridge ingredients, these beauties gave me the opportunity to use up some “many days old” bread and the last of some mozzarella cheese that needed to go, too! When served alongside a green salad topped with some apples, dried cranberries, a sprinkle of goat cheese, nuts and a balsamic vinaigrette, you end up with quite an elegant vegetarian meal. Add some roasted Brussels sprouts and you may even have a vegetarian Thanksgiving meal for two!

Stuffed Portobello Mushrooms
Makes 2 servings

2 large portobello mushroom caps, cleaned with a wet paper towel, stems removed, chopped and set aside
2 large shallots, peeled and minced
1 tablespoon extra virgin olive oil
2 slices multigrain and seeded bread, cut into small (about 1/2 inch) cubes
1 teaspoon chopped fresh flat leaf parsley
1 teaspoon chopped fresh basil, any type
2 sun-dried tomatoes packed in oil, finely chopped
1 generous tablespoon arugula pesto
2 tablespoons dry white wine (dry rosé will work as well)
2 tablespoons finely grated parmigiano reggiano cheese
1/2 cup shredded mozzarella cheese, divided
Kosher salt and freshly ground black pepper to taste
Extra virgin olive oil for lightly coating the mushrooms and the stuffing

Preheat the oven to 375 degrees F. Grease a glass baking dish or line a baking sheet with aluminum foil and grease with a tiny bit of olive oil.

Add the olive oil to a medium sized non-stick skillet and heat over medium heat. Add the chopped mushroom stems and the shallots and cook until the shallots are tender and just beginning to turn golden. Remove from the heat. In a large bowl, combine the bread, parsley, basil and tomatoes. Stir in the shallot and mushroom mixture, pesto, wine, the parmesan cheese and 1/4 cup of the mozzarella. Season with some salt and freshly ground black pepper to taste. The stuffing should just barely hold together when pressed with your hands.

Place the two mushrooms on the prepared baking dish gill side up, drizzle about 1/2 teaspoon of olive oil onto each mushroom and coat the cap with your fingers. Very lightly season each mushroom cap with a tiny bit of salt and pepper. Place one half of the stuffing into the gill cavity of each mushroom, pressing and mounding the stuffing to fit into a dome shape. Drizzle the top of the stuffing with about 1/2 teaspoon of olive oil. Sprinkle the top of each mushroom with the remaining mozzarella, dividing evenly. Sprinkle the mozzarella with another grind of black pepper. Place the mushrooms into the oven and bake for about 30-35 minutes. Check to see if the mushrooms are done and bake for up to 5 to 10 more minutes if needed, or until the cheese is golden brown and the mushrooms are tender. Remove from the oven and serve immediately with a green salad, some leftover Brussels sprouts if you got ’em and a knife and fork.

*****

Bon Appétit magazine used to close every issue by asking a celebrity: “What three items do you always have in your fridge?” The three things I know are in my fridge are good quality parmigiano reggiano cheese, sun-dried tomatoes and nuts of some sort. Without those items, I’m somewhat lost, because WITH those items I can make a world of difference in a lot of dishes. What are your three items?